17: Images in HTML
11th October 2012: Material moved to webplatform.org
The Opera web standards curriculum has now been moved to the docs section of the W3C webplatform.org site. Go there to find updated versions of these docs, and much more besides!
12th April 2012: This article is obsolete
The web standards curriculum has been donated to the W3C web education community group, to become part of a much bigger educational resource. It is constantly being updated so that it remains current with modern web design practices and technologies. To find the most up-to-date web standards curriculum, visit the web education community group Wiki. Please make changes to this Wiki yourself, or suggest changes to Chris Mills, who is also the chair of the web education community group.
Introduction
In this tutorial I’ll talk about one of the things that makes web design pretty—images. At the end of this tutorial you’ll know how to add imagery to web documents in an accessible way (so that people with visual impairments can still use the information on your site) and how and when to use inline images for delivering information or background images for page layout. You can download the example files used in this article here—I’ll refer to these files during the course of the tutorial. The contents are as follows:
- A picture says more than a thousand words—or does it?
- Different types of images on the web—content and background images
- The
imgelement and its attributes - So much for inline images
- Background images with CSS
- Summary
- Exercise questions
A picture says more than a thousand words—or does it?
It is very tempting to use a lot of imagery on your web sites. Images are a great way to set the mood for the visitor and illustrations are a nice way to make complex information easier to take in for visual learners.
The drawback of images on the web is that not everybody who surfs the web can see them. Back in the days when images were first supported by browsers, many site visitors had images turned off, to save on traffic and get a faster surfing experience—web connections used to be very slow, and you’d pay a lot of money for each minute you were online. While this is not very common these days, we’re still not out of the woods—by a long shot:
- People surfing on mobile devices might still have images turned off because of small screens and the cost of downloading data.
- Visitors of your site might be blind or visually impaired to such a degree that they cannot see your images properly.
- Other visitors might be from a different culture and not understand the icons you use.
- Search engines only index text—they don’t analyze images (yet), which means that information stored in images cannot be found and indexed.
It is therefore very important to choose images wisely and only use them when appropriate. It is even more important to make sure you always offer a fallback for those who cannot see your images. There is more on the problems of wrongly used icons and images in the “Web navigation and menus” tutorial later on in the series (to be published soon). For now, let’s see what technologies are available to add images to an HTML document.
Different types of images on the web—content and background images
There are two main ways to add images to a document: content images using the img element and background images applied to elements using CSS. When to use what is dependent on what you want to do:
- If the image is crucial to the content of the document, for example a photo of the author or a graph showing some data, it should be added as an
imgelement with proper alternative text. - If the image is there as “eye candy” you should use CSS background images. The reason is that these images should not have any alternative text (what use is “round green corner with a twinkle” to a blind person?) and you have a lot more options to deal with image styling in CSS than in HTML.
The img element and its attributes
Adding an image to an HTML document is very easy using the img element. The following HTML document (inlineimageexample.html in the zip file) displays the photo balconyview.jpg in a browser (provided that you have the image in the same folder as the HTML file.)
<!DOCTYPE HTML PUBLIC "-//W3C//DTD HTML 4.01//EN" "http://www.w3.org/TR/html4/strict.dtd">
<html>
<head>
  <title>Example of an inline image</title>
</head>
<body>
<img src="balconyview.jpg">
</body>
</html>
If you run this code in a browser, you’ll get an output as shown in Figure 1.
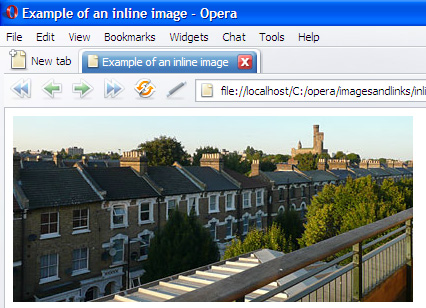
Figure 1: The image as it is shown in a browser.
Providing a text alternative with the alt attribute
This displays the image fine, however, it is invalid HTML because the img element needs an alt attribute. This attribute contains text that is displayed if the image is not available for some reason. The image may not be available because it could not be found, loaded or because the user agent (normally a browser) does not support images. In addition, people with visual disabilities use assistive technologies to read web pages to them. These technologies will read the contents of the alt attribute of img elements out to their users. It is therefore important to write good alternative text to describe the contents of the image and put it in the alt attribute.
You’ll find a lot of texts on the web talking about “alt tags”. This is factually wrong as there is no tag (or element) with that name. It is an attribute of the img element and amazingly important both for accessibility and search engine optimization.
In order to make the image understandable for everybody you need to add a proper alternative text, for example in this case “View from my balcony, showing a row of houses, trees and a castle” (inlineimageexamplealt.html):
<!DOCTYPE HTML PUBLIC "-//W3C//DTD HTML 4.01//EN" "http://www.w3.org/TR/html4/strict.dtd">
<html>
<head>
  <title>Example of an inline image</title>
</head>
<body>
<img src="balconyview.jpg" alt="View from my balcony, showing a row of houses, trees and a castle">
</body>
</html>
The alt attribute contains the text that should be displayed when the image is not available. The information in the alt attribute should not be displayed when the image was successfully loaded and shown; Internet Explorer gets this wrong, and shows it as a tooltip when you hover your mouse pointer over the image for a while. This is a mistake, as it leads a lot of people to add additional information about the image into the alt attribute. If you wanted to add additional information, you should use the title attribute instead, which I’ll get on to in the next section.
Adding nice-to-have information using the title attribute
Most browsers will display the value of an img element’s title attribute as a tool-tip when you hover your mouse cursor over it (see Figure 2.) This can help a visitor learn more about the image, but you cannot rely on each visitor to have a mouse. The title attribute can be very useful, but it is not a safe way of providing crucial information. Instead it offers a good way to, for example, write about the mood of the image, or what it means in context (inlineimagewithtitle.html):
<!DOCTYPE HTML PUBLIC "-//W3C//DTD HTML 4.01//EN" "http://www.w3.org/TR/html4/strict.dtd">
<html>
<head>
  <title>Example of an inline image with alternative text and title</title>
</head>
<body>
<img src="balconyview.jpg" alt="View from my balcony, showing a row of houses, trees and a castle" title="What I see when I look out of my window; the castle was one reason to move there.">
</body>
</html>
If you load this code in your browser, you will see the display shown in Figure 2.
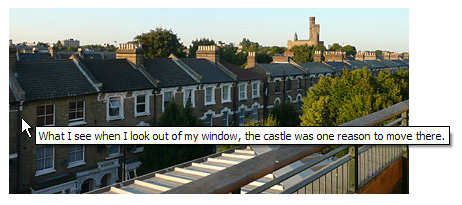
Figure 2: title attributes are shown as tool tips in a lot of browsers.
Using longdesc to provide an alternative for complex images
If the image is a very complex image, like for example a chart, you can offer a more lengthy description of it using the longdesc attribute, so that people using screenreaders or browsing with images turned off can still access the information conveyed by the image.
This attribute contains a URL that points to a document containing the same information. For example, if you have a chart showing a set of data, you can link it to a data table with the same information using longdesc (inlineimagelongdesc.html):
<!DOCTYPE HTML PUBLIC "-//W3C//DTD HTML 4.01//EN" "http://www.w3.org/TR/html4/strict.dtd">
<html>
<head>
  <title>Example of an inline image with longdesc</title>
</head>
<body>
<img src="chart.png" width="450" height="150" alt="Chart showing the fruit consumption amongst under 15 year olds. Most children ate Pineapples, followed by Pears" longdesc="fruitconsumption.html">
</body>
</html>
The data file fruitconsumption.html contains a very simple data table that represents the same data:
<!DOCTYPE HTML PUBLIC "-//W3C//DTD HTML 4.01//EN" "http://www.w3.org/TR/html4/strict.dtd">
<html>
<head>
  <title>Fruit consumption</title>
</head>
<body>
<table summary="Fruit Consumption of under 15 year olds, March 2007">
  <caption>Fruit Consumption</caption>
  <thead>
    <tr><th scope="col">Fruit</th><th scope="col">Amount</th></tr>
  </thead>
  <tbody>
    <tr><td>Apples</td><td>10</td></tr>
    <tr><td>Oranges</td><td>58</td></tr>
    <tr><td>Pineapples</td><td>95</td></tr>
    <tr><td>Bananas</td><td>30</td></tr>
    <tr><td>Raisins</td><td>8</td></tr>
    <tr><td>Pears</td><td>63</td></tr>
  </tbody>
</table>
<p><a href="inlineimagelongdesc.html">Back to article</a></p>
</body>
</html>
The two different data representations side by side look like that seen in Figure 3.

Figure 3: You can link a document with complex data to an image by using the longdesc attribute.
Note that there is no visual clue that there is a long description file connected with this image. Assistive technologies however will let their users know there is an alternative available.
Faster image display by defining the dimensions using width and height
When the user agent finds an img element in the HTML, it starts loading the image the src attribute points to. By default, it doesn’t know the image’s dimensions, so it’ll just display all the text lumped together, then shift the rest of the document around when the images finally load and appear. This can slow down page loading and looks a bit confusing to the page visitors. To stop this happening you can tell the user agent to allocate the right amount of space for the images before they load by giving it the image’s dimensions using the width and height attributes (inlineimagewithdimensions.html):
<!DOCTYPE HTML PUBLIC "-//W3C//DTD HTML 4.01//EN" "http://www.w3.org/TR/html4/strict.dtd">
<html>
<head>
  <title>Example of an inline image with dimensions</title>
</head>
<body>
<img src="balconyview.jpg" alt="View from my balcony, showing a row of houses, trees and a castle" width="400" height="186">
</body>
</html>
This will display a place holder the size of the image until the image loads and takes up its place, therefore avoiding the unsightly page shift. You can also resize images using these attributes (try halving the attribute values in the above example, saving it, and then reloading the page), but this is not a good idea as the quality of resizing is not smooth in all browsers. It is especially bad to resize images to become thumbnails, as the idea of thumbnails is that you not only have a smaller image in physical size, but also in file size. Nobody wants to load a 300KB photo just to see a small image that could be 5KB.
So much for inline images
There are a lot more attributes you can use in images but most are deprecated as they define the layout and alignment of the image. This is not the job of HTML—it is what CSS was invented for. Suffice to say it is important to remember that images are—by default—inline elements. This means they can appear in between words in text without forcing new lines. This is great if you want to add small icons within copy, but it can be annoying when you are trying to create layouts using images and text. Using CSS you can override the inline default and make images appear like block level elements (elements that appear on a new line when you add them to a document).
Background images with CSS
It is pretty safe to say that web design became a lot more fun when browsers started supporting CSS. Instead of hacking around in the HTML using table cells for positioning items on the page, non-breaking-spaces ( ) to preserve spacing, and spacer GIFs (transparent 1x1 pixel GIF images that were resized to create margins) we can now use padding, margin, dimensions and positioning in CSS and leave the HTML free to just worry about the content structure.
CSS also means you can use background images in a very versatile way—you can position them behind and around your text any way you want, and also repeat images in regular patterns to create backgrounds. I’ll only cover CSS images briefly here, as a later article will cover CSS background images in much more detail.
How to apply backgrounds with CSS
The CSS to apply images as backgrounds is pretty easy. Before you look at the CSS code below, load the imagesandcss.html example file in your browser, or look at Figure 4, to get an idea of all the different things that are possible with background images in CSS.
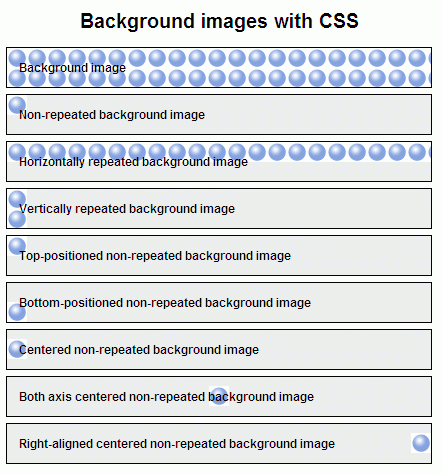
Figure 4: Backgrounds with CSS.
The different boxes are actually styled h2 heading elements with some padding and borders applied through CSS to give us enough space to show the background image. If you check out the HTML file, you’ll see that each h2 element has a unique id so each one can have a different CSS rule applied to it. The CSS for the first example is the following:
background-image:url (ball.gif);
background-color:#eee;
You add the image with the background-image selector and give it a URL in parenthesis to specify the image to be included. As a fallback in case the image is not available, you should also provide a background colour with the background-color selector and a (hexadecimal, named or RGB) colour value (in this case I chose a light grey).
By default, background images will be repeated both horizontally and vertically to fill up the whole element space. You can however define a different repetition with the background-repeat selector:
- Don’t repeat the image at all:
background-repeat:no-repeat; - Just repeat the image horizontally:
background-repeat:repeat-x; - Just repeat the image vertically:
background-repeat:repeat-y;
By default the background image (if not repeated) will be positioned at the top and left corner of the element. You can however use background-position to move the background image around. The easiest values to choose are top, center, and bottom for the vertical alignment and left, center, and right for the horizontal alignment. For example, to position the image on the bottom right you need to use
background-position:bottom-right; , while to centre the image vertically and apply it to the right you would use
background-position:center-right;.
By controlling the repetition and the position of background images and using clever images you can create a lot of stunning effects that were not possible before CSS, and by keeping the background definitions in a separate CSS file you make it very easy to change the look and feel of a whole site by changing some lines of code. This will all be covered later in Article 30.
Summary
That’s all you need to know to get you going when it comes to adding images to HTML. There are a lot more tricks available using images and CSS, but for now have a go with what you learnt here and concentrate on best-practice application of images. We talked about:
- The
imgelement and its basic attributes:srcfor the file location of the imagealtfor text that should be available when the image is not loaded or cannot be seentitlefor interesting (but not essential) additional informationlongdescto point to an external data file containing an alternative textual representation of the data illustrated in the image when the image is for example a complex chartwidthandheightto tell the browser how large the image is and therefore how much space to allocate for it
-
The basics of CSS background images
- When to use backgrounds (basically when the image does not need a text alternative but is only “eye candy” or “screen furniture”, for layout.)
- How to position and repeat background images in CSS
Exercise Questions
- Why is it important to add good text to an image in an
altattribute and do you really need one? - If you have an image that is 1280x786 pixels large and you want to show a 40x30 pixel thumbnail, can you do that in HTML and is it wise to do so?
- What does the
longdescattribute do, and how do browsers show it? - What do the
valignand thealignattributes do and why weren’t they covered here? - Where are CSS background images positioned inside an element by default, and how do they get repeated by default?
About the author

Photo credit: Bluesmoon
Chris Heilmann has been a web developer for ten years, after dabbling in radio journalism. He works for Yahoo! in the UK as trainer and lead developer, and oversees the code quality on the front end for Europe and Asia.
Chris blogs at Wait till I come and is available on many a social network as “codepo8”.
This article is licensed under a Creative Commons Attribution, Non Commercial - Share Alike 2.5 license.
Comments
The forum archive of this article is still available on My Opera.
-

you mentioned that setting the height and width of an image saves the space and avoids the page content "warping" around when loading. does this have the same effect if you use a percentage value instead of the pixel dimension? for example, on this (example page) , the image that runs along the top (ripped paper looking thing) is set to 100%. does this set the image container to the width of the page avoiding the content shuffle? or will it still have to calculate the pixels?
No new comments accepted.kylierocks
Tuesday, February 12, 2013