We'll do this mostly as a demonstration. I encourage you to login to your account and try out the various examples yourself as we go through them.
Much of this material is based on the extensive Savio documention we have prepared and continue to prepare, available at http://research-it.berkeley.edu/services/high-performance-computing/user-guide.
The materials for this tutorial are available using git at https://github.com/ucberkeley/savio-training-intro-2016 or simply as a zip file.
This training session will cover the following topics:
Faculty/principal investigators can allow researchers working with them to get user accounts with access to the FCA or condo resources available to the faculty member.
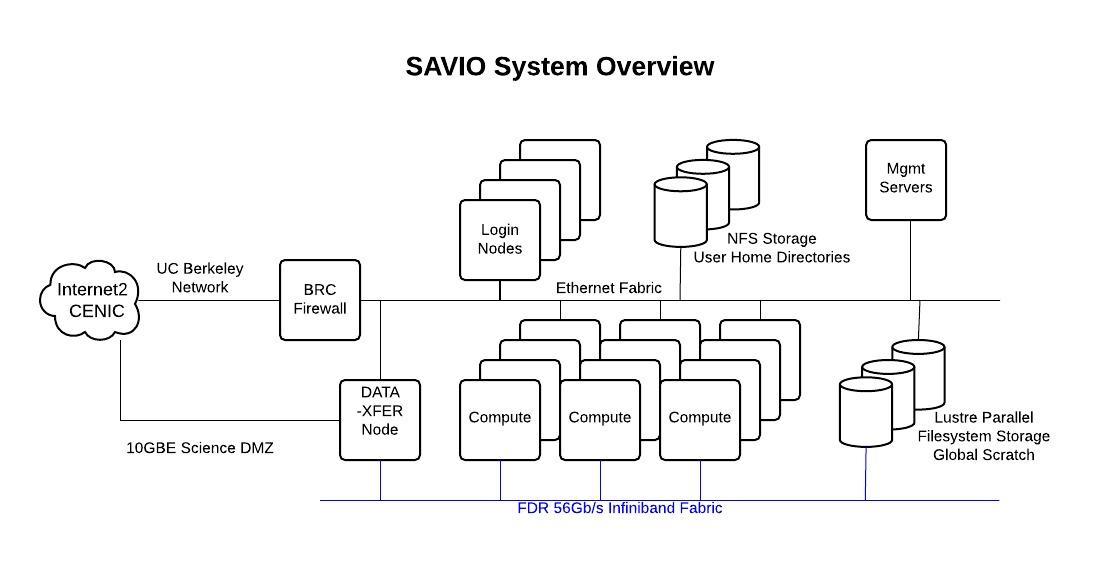
Let's take a look at the hardware specifications of the computing nodes on the cluster (see the Hardware Configuration section of this document).
The nodes are divided into several pools, called partitions. These partitions have different restrictions and costs associated with them (see the Configuration Details section of this document). Any job you submit must be submitted to a partition to which you have access.
You have access to the following disk space, described here in the Storage and Backup section.
When reading/writing data to/from disk, unless the amount of data is small, please put the data in your scratch space at /global/scratch/SAVIO_USERNAME. The system is set up so that disk access for all users is optimized when users are doing input/output (I/O) off of scratch rather than off of their home directories. Doing I/O with files on your home directory can impact the ability of others to access their files on the filesystem.
We are also making available disk space for purchase via a new condo storage offering. The minimum purchase will likely be around $14,000, which will provide roughly 40 TB for five years, but the exact details are still being worked out.
Savio has a few different kinds of nodes:
To login, you need to have software on your own machine that gives you access to a UNIX terminal (command-line) session. These come built-in with Mac (see Applications -> Utilities -> Terminal). For Windows, some options include PuTTY.
You also need to set up your smartphone or tablet with Google Authenticator to generate one-time passwords for you.
Here are instructions for doing this setup, and for logging in.
Then to login:
ssh SAVIO_USERNAME@hpc.brc.berkeley.eduThen enter XXXXXYYYYYY where XXXXXX is your PIN and YYYYYY is the one-time password. YYYYYY will be shown when you open your Google authenticator app on your phone/tablet.
One can then navigate around and get information using standard UNIX commands such as ls, cd, du, df, etc.
If you want to be able to open programs with graphical user interfaces:
ssh -Y SAVIO_USERNAME@hpc.brc.berkeley.eduTo display the graphical windows on your local machine, you'll need X server software on your own machine to manage the graphical windows. For Windows, your options include eXceed or Xming and for Mac, there is XQuartz.
Sidenote: we are investigating other mechanisms to interact with Savio via a graphical user interface (GUI).
Let's see how we would transfer files/data to/from Savio using a few different approaches.
We can use the scp and sftp protocols to transfer files.
You need to use the Savio data transfer node, dtn.brc.berkeley.edu.
Linux/Mac:
# to Savio, while on your local machine
scp bayArea.csv paciorek@dtn.brc.berkeley.edu:~/.
scp bayArea.csv paciorek@dtn.brc.berkeley.edu:~/data/newName.csv
scp bayArea.csv paciorek@dtn.brc.berkeley.edu:/global/scratch/paciorek/.

# from Savio, while on your local machine
scp paciorek@dtn.brc.berkeley.edu:~/data/newName.csv ~/Desktop/.
If you can ssh to your local machine or want to transfer files to other systems on to which you can ssh, you can syntax like this, while logged onto Savio:
ssh dtn
scp ~/file.csv OTHER_USERNAME@other.domain.edu:~/data/.
One program you can use with Windows is WinSCP, and a multi-platform program for doing transfers via SFTP is FileZilla. After logging in, you'll see windows for the Savio filesystem and your local filesystem on your machine. You can drag files back and forth.
You can package multiple files (including directory structure) together using tar:
tar -cvzf files.tgz dir_to_zip
# to untar later:
tar -xvzf files.tgzYou can use Globus Connect to transfer data data to/from Savio (and between other resources) quickly and unattended. This is a better choice for large transfers. Here are some instructions.
Globus transfers data between endpoints. Possible endpoints include: Savio, your laptop or desktop, NERSC, and XSEDE, among others.
Savio's endpoint is named ucb#brc.
If you are transferring to/from your laptop, you'll need 1) Globus Connect Personal set up, 2) your machine established as an endpoint and 3) Globus Connect Pesonal actively running on your machine. At that point you can proceed as below.
To transfer files, you open Globus at globus.org and authenticate to the endpoints you want to transfer between. You can then start a transfer and it will proceed in the background, including restarting if interrupted.
Globus also provides a command line interface that will allow you to do transfers programmatically, such that a transfer could be embedded in a workflow script.
Box provides unlimited, free, secured, and encrypted content storage of files with a maximum file size of 15 Gb to Berkeley affiliates. So it's a good option for backup and long-term storage.
You can move files between Box and your laptop using the Box Sync app. And you can interact with Box via a web browser at http://box.berkeley.edu.
The best way to move files between Box and Savio is via lftp as discussed here.
Here's how you logon to box via lftp on Savio (assuming you've set up an external password already as described in the link above):
ssh SAVIO_USERNAME@dtn.brc.berkeley.edu
module load lftp
lftp ftp.box.com
set ssl-allow true
user CAMPUS_USERNAME@berkeley.edu
lpwd # on Savio
ls # on box
!ls # on Savio
mkdir workshops
cd workshops # on box
lcd savio-training-intro-2016 # on savio
put foreach-doMPI.R # savio to box
get AirlineDataAll.ffData # box to savio; 1.4 Gb in ~ 1 minuteOne additional command that can be quite useful is mirror, which lets you copy an entire directory to/from Box.
# to upload a directory from Savio to Box
mirror -R mydir
# to download a directory from Box to Savio
mirror mydir .
Be careful, because it's fairly easy to wipe out files or directories on Box.
Finally you can set up special purpose accounts (Berkeley SPA) so files are owned at a project level rather than by individuals.
BRC is working (long-term) on making Globus available for transfer to/from Box, but it's not available yet.
bDrive provides unlimited, free, secured, and encrypted content storage of files with a maximum file size of 5 Tb to Berkeley affiliates.
You can move files to and from your laptop using the Google Drive app.
There are also some third-party tools for copying files to/from Google Drive, though I've found them to be a bit klunky. This is why we recommend using Box for workflows at this point. However, BRC is also working (short-term) on making Globus available for transfer to/from bDrive, though it's not available yet.
A lot of software is available on Savio but needs to be loaded from the relevant software module before you can use it.
module list  # what's loaded?
module avail  # what's available
One thing that tricks people is that the modules are arranged in a hierarchical (nested) fashion, so you only see some of the modules as being available after you load the parent module. Here's how we see the Python packages that are available.
which python
python

module avail
module load python/2.7.8
which python
module avail
module load numpy
python
# import numpy as np
Similarly, we can see that linear algebra, FFT, and HDF5/NetCDF software is available only after loading either the intel or gcc modules.
module load intel
module avail
module swap intel gcc
module availAll computations are done by submitting jobs to the scheduling software that manages jobs on the cluster, called SLURM.
When submitting a job, the main things you need to indicate are the project account you are using (in some cases you might have access to multiple accounts such as an FCA and a condo) and the partition.
You can see what accounts you have access to and which partitions within those accounts as follows:
sacctmgr -p show associations user=SAVIO_USERNAMEHere's an example of the output for a user who has access to an FCA, a condo, and a special partner account:
Cluster|Account|User|Partition|Share|GrpJobs|GrpTRES|GrpSubmit|GrpWall|GrpTRESMins|MaxJobs|MaxTRES|MaxTRESPerNode|MaxSubmit|MaxWall|MaxTRESMins|QOS|Def QOS|GrpTRESRunMins|
brc|co_stat|paciorek|savio2_gpu|1||||||||||||savio_lowprio|savio_lowprio||
brc|co_stat|paciorek|savio2_htc|1||||||||||||savio_lowprio|savio_lowprio||
brc|co_stat|paciorek|savio|1||||||||||||savio_lowprio|savio_lowprio||
brc|co_stat|paciorek|savio_bigmem|1||||||||||||savio_lowprio|savio_lowprio||
brc|co_stat|paciorek|savio2|1||||||||||||savio_lowprio,stat_normal|stat_normal||
brc|fc_paciorek|paciorek|savio2|1||||||||||||savio_debug,savio_normal|savio_normal||
brc|fc_paciorek|paciorek|savio|1||||||||||||savio_debug,savio_normal|savio_normal||
brc|fc_paciorek|paciorek|savio_bigmem|1||||||||||||savio_debug,savio_normal|savio_normal||
brc|ac_scsguest|paciorek|savio2_htc|1||||||||||||savio_debug,savio_normal|savio_normal||
brc|ac_scsguest|paciorek|savio2_gpu|1||||||||||||savio_debug,savio_normal|savio_normal||
brc|ac_scsguest|paciorek|savio2|1||||||||||||savio_debug,savio_normal|savio_normal||
brc|ac_scsguest|paciorek|savio_bigmem|1||||||||||||savio_debug,savio_normal|savio_normal||
brc|ac_scsguest|paciorek|savio|1||||||||||||savio_debug,savio_normal|savio_normal||
If you are part of a condo, you'll notice that you have low-priority access to certain partitions. For example I am part of the statistics cluster co_stat, which owns some Savio2 nodes and therefore I have normal access to those, but I can also burst beyond the condo and use other partitions at low-priority (see below).
In contrast, through my FCA, I have access to the savio, savio2, and big memory partitions.
Let's see how to submit a simple job. If your job will only use the resources on a single node, you can do the following.
Here's an example job script that I'll run. You'll need to modify the --account value and possibly the --partition value.
    #!/bin/bash
    # Job name:
    #SBATCH --job-name=test
    #
    # Account:
    #SBATCH --account=co_stat
    #
    # Partition:
    #SBATCH --partition=savio2
    #
    # Wall clock limit (30 seconds here):
    #SBATCH --time=00:00:30
    #
    ## Command(s) to run:
    module load python/3.2.3 numpy
    python3 calc.py >& calc.out
Now let's submit and monitor the job:
sbatch job.sh

squeue -j JOB_ID

wwall -j JOB_ID
Note that except for the savio2_htc and savio2_gpu partitions, all jobs are given exclusive access to the entire node or nodes assigned to the job (and your account is charged for all of the cores on the node(s).
If you are submitting a job that uses multiple nodes, you'll need to carefully specify the resources you need. The key flags for use in your job script are:
--nodes (or -N): indicates the number of nodes to use--ntasks-per-node: indicates the number of tasks (i.e., processes) one wants to run on each node--cpus-per-task (or -c): indicates the number of cpus to be used for each taskIn addition, in some cases it can make sense to use the --ntasks (or -n) option to indicate the total number of tasks and let the scheduler determine how many nodes and tasks per node are needed. In general --cpus-per-task will be 1 except when running threaded code.
Here's an example job script for a job that uses MPI for parallelizing over multiple nodes:
   #!/bin/bash
   # Job name:
   #SBATCH --job-name=test
   #
   # Account:
   #SBATCH --account=account_name
   #
   # Partition:
   #SBATCH --partition=partition_name
   #
   # Number of MPI tasks needed for use case (example):
   #SBATCH --ntasks=40
   #
   # Processors per task:
   #SBATCH --cpus-per-task=1
   #
   # Wall clock limit:
   #SBATCH --time=00:00:30
   #
   ## Command(s) to run (example):
   module load intel openmpi
   mpirun ./a.out
When you write your code, you may need to specify information about the number of cores to use. SLURM will provide a variety of variables that you can use in your code so that it adapts to the resources you have requested rather than being hard-coded.
Here are some of the variables that may be useful: SLURM_NTASKS, SLURM_CPUS_PER_TASK, SLURM_NODELIST, SLURM_NNODES.
Some common paradigms are:
There are lots more examples of job submission scripts for different kinds of parallelization (multi-node (MPI), multi-core (openMP), hybrid, etc.) here.
You can also do work interactively.
For this, you may want to have used the -Y flag to ssh if you are running software with a GUI such as MATLAB.
# ssh -Y SAVIO_USERNAME@hpc.brc.berkeley.edu
srun -A co_stat -p savio2  -N 1 -t 10:0 --pty bash
# now execute on the compute node:
module load matlab
matlabCondo users have access to the broader compute resource that is limited only by the size of partitions, under the savio_lowprio QoS (queue). However this QoS does not get a priority as high as the general QoSs, such as savio_normal and savio_debug, or all the condo QoSs, and it is subject to preemption when all the other QoSs become busy.
More details can be found in the Low Priority Jobs section of the user guide.
Suppose I wanted to burst beyond the Statistics condo to run on 20 nodes. I'll illustrate here with an interactive job though usually this would be for a batch job.
srun -A co_stat -p savio2 --qos=savio_lowprio  -N 20 -t 10:0 --pty bash
env | grep SLURMThere is a partition called the HTC partition that allows you to request cores individually rather than an entire node at a time. The nodes in this partition are faster than the other nodes.
You must request access to the HTC partition at this time before you can submit jobs to it.
srun -A co_stat -p savio2_htc  -n 2 -t 10:0 --pty bash
env | grep SLURM
module load python/3.2.3 numpy
python3 calc.py >& calc.out &
topYou may have many serial jobs to run. It may be more cost-effective to collect those jobs together and run them across multiple cores on one or more nodes.
Here are some options:
The basic command for seeing what is running on the system is squeue:
squeue
squeue -u SAVIO_USERNAME
squeue -A co_stat
To see what nodes are available in a given partition:
sinfo -p savio
sinfo -p savio2_gpu
You can cancel a job with scancel.
scancel YOUR_JOB_IDFor more information on cores, QoS, and additional (e.g., GPU) resources, here's some syntax:
squeue -o "%.7i %.9P %.20j %.8u %.2t %.9M %.5C %.8r %.6D %R %p %q %b" We provide some tips about monitoring your job.
Let's see a basic example of doing an analysis in Python across multiple cores on multiple nodes. We'll use the airline departure data in bayArea.csv.
Here we'll use IPython for parallel computing. The example is a bit contrived in that a lot of the time is spent moving data around rather than doing computation, but it should illustrate how to do a few things.
First we'll install a Python package not already available as a module.
# remember to do I/O off scratch
cp bayArea.csv /global/scratch/paciorek/.
# install Python package
module load pip
# trial and error to realize which package dependencies available in modules...
module load python/2.7.8 numpy scipy six pandas pytz
pip install --user statsmodels
Now we'll start up an interactive session, though often this sort of thing would be done via a batch job.
srun -A co_stat -p savio2 -N 2 --ntasks-per-node=24 -t 30:0 --pty bashNow we'll start up a cluster using IPython's parallel tools. To do this across multiple nodes within a SLURM job, it goes like this:
module load python/2.7.8 ipython gcc openmpi
ipcontroller --ip='*' &
sleep 5
srun ipengine &
sleep 15  # wait until all engines have successfully started
ipython
If we were doing this on a single node, we could start everything up in a single call to ipcluster:
module load python/2.7.8 ipython
ipcluster start -n $SLURM_CPUS_ON_NODE &
ipython
Here's our Python code (also found in parallel.py) for doing an analysis across multiple strata/subsets of the dataset in parallel. Note that the 'load_balanced_view' business is so that the computations are done in a load-balanced fashion, which is important for tasks that take different amounts of time to complete.
from IPython.parallel import Client
c = Client()
c.ids

dview = c[:]
dview.block = True
dview.apply(lambda : "Hello, World")

lview = c.load_balanced_view()
lview.block = True

import pandas
dat = pandas.read_csv('bayArea.csv', header = None)
dat.columns = ('Year','Month','DayofMonth','DayOfWeek','DepTime','CRSDepTime','ArrTime','CRSArrTime','UniqueCarrier','FlightNum','TailNum','ActualElapsedTime','CRSElapsedTime','AirTime','ArrDelay','DepDelay','Origin','Dest','Distance','TaxiIn','TaxiOut','Cancelled','CancellationCode','Diverted','CarrierDelay','WeatherDelay','NASDelay','SecurityDelay','LateAircraftDelay')

dview.execute('import statsmodels.api as sm')

dat2 = dat.loc[:, ('DepDelay','Year','Dest','Origin')]
dests = dat2.Dest.unique()

mydict = dict(dat2 = dat2, dests = dests)
dview.push(mydict)

def f(id):
    sub = dat2.loc[dat2.Dest == dests[id],:]
    sub = sm.add_constant(sub)
    model = sm.OLS(sub.DepDelay, sub.loc[:,('const','Year')])
    results = model.fit()
    return results.params

import time
time.time()
parallel_result = lview.map(f, range(len(dests)))
#result = map(f, range(len(dests)))
time.time()

# some NaN values because all 'Year' values are the same for some destinations

parallel_result
And we'll stop our cluster.
ipcluster stopLet's see a basic example of doing an analysis in R across multiple cores on multiple nodes. We'll use the airline departure data in bayArea.csv.
We'll do this interactively though often this sort of thing would be done via a batch job.
# remember to do I/O off scratch
cp bayArea.csv /global/scratch/paciorek/.
module load r Rmpi
Rscript -e "install.packages('doMPI', repos = 'http://cran.cnr.berkeley.edu', lib = '/global/home/users/paciorek/R/x86_64-pc-linux-gnu-library/3.2')"

srun -A co_stat -p savio2  -N 3 --ntasks-per-node=24 -t 30:0 --pty bash
module load gcc openmpi r Rmpi
mpirun R CMD BATCH --no-save parallel-multi.R parallel-multi.Rout &
Now here's the R code (see parallel-multi.R) we're running:
library(doMPI)

cl = startMPIcluster()  # by default will start one fewer slave
registerDoMPI(cl)
clusterSize(cl) # just to check

dat <- read.csv('/global/scratch/paciorek/bayArea.csv', header = FALSE,
                stringsAsFactors = FALSE)
names(dat)[16:18] <- c('delay', 'origin', 'dest')
table(dat$dest)

destVals <- unique(dat$dest)

# restrict to only columns we need to reduce copying time
dat2 <- subset(dat, select = c('delay', 'origin', 'dest'))

# some overhead in copying 'dat2' to worker processes...
results <- foreach(destVal = destVals) %dopar% {
    sub <- subset(dat2, dest == destVal)
    summary(sub$delay)
}


results

closeCluster(cl)
mpi.quit()
If you just want to parallelize within a node:
srun -A co_stat -p savio2  -N 1 -t 30:0 --pty bash
module load r
R CMD BATCH --no-save parallel-one.R parallel-one.Rout &
Now here's the R code (see parallel-one.R) we're running:
library(doParallel)

nCores <- Sys.getenv('SLURM_CPUS_ON_NODE')
registerDoParallel(nCores)

dat <- read.csv('/global/scratch/paciorek/bayArea.csv', header = FALSE,
                stringsAsFactors = FALSE)
names(dat)[16:18] <- c('delay', 'origin', 'dest')
table(dat$dest)

destVals <- unique(dat$dest)

results <- foreach(destVal = destVals) %dopar% {
    sub <- subset(dat, dest == destVal)
    summary(sub$delay)
}

results