Automating Data-analysis Pipelines
Shaun Jackman and Jenny Bryan
2014-11-03
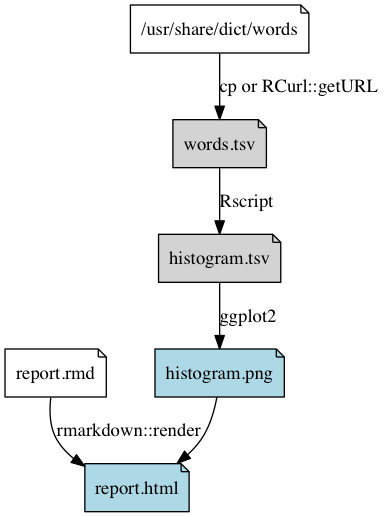
- Dependency graph of the pipeline
- Set up a new RStudio Project (and Git repo)
- Sample Project and Git repository
- Create the Makefile
- Get the dictionary of words
- Create rules for all and clean
- Create a table of word lengths
- Update rules for all and clean
- Plot a histogram of word lengths, update all and clean
- Use
maketo deal with an annoyance - Render an HTML report
- The Final Makefile
- Appendix
The goal of this activity is to create a pipeline that will
- obtain a large file of English words
- calculate a histogram of word lengths
- determine the most common word length
- generate a figure of this histogram
- render a R Markdown report in HTML and PDF
You will automate this pipeline using make!
back to All the automation things
Dependency graph of the pipeline
Set up a new RStudio Project (and Git repo)
In RStudio: File > New Project > New Directory > Empty Project. If you’re a Git user, we strongly encourage you to click on “Create a git repository.”
This project will be useful as a reference in the future, so give it an informative name and location. If you’re a GitHub user, you may want to push it there as well.
Git(Hub) users: from here on out, we assume you will be committing at regular intervals. At key points, we explicitly prompt you to commit.
Git folks: commit now.
Sample Project and Git repository
We walked through this activity ourselves and this Git repo reflects how our Project evolved.
The Project is set up for use with make at this commit.
Create the Makefile
In RStudio: File > New File > Text File. Save it with the name Makefile. Keep adding the rules we write below to this file, saving regularly.
Once you’ve saved the file with the name Makefile, RStudio should indent with tabs instead of spaces. I recommend you display whitespace in order to visually confirm this: RStudio > Preferences > Code > Display > Display whitespace characters. A more extreme measure is to set Project or Global preferences to NOT replace tabs with spaces, but this will wreak havoc elsewhere.
You also want RStudio to recognize the presence of the Makefile. Pick one:
- set Project Build Tools to
Makefile - quit and relaunch
You should see a “Build” tab now in the same pane as “Environment”, “History”, and, if applicable, “Git”.
Git folks: commit now.
Get the dictionary of words
Depending on your OS and mood, you can get the file of English words by copying a local file or downloading from the internet.
Download the dictionary
Our first Makefile rule will download the dictionary words.txt. The command of this rule is a one-line R script, so instead of putting the R script in a separate file, we’ll include the command directly in the Makefile, since it’s so short. Sure, we could download a file without using R at all but humor us: this is a tutorial about make and R!
words.txt:
	Rscript -e 'download.file("https://svnweb.freebsd.org/base/head/share/dict/web2?view=co", destfile = "words.txt", quiet = TRUE)'
Suggested workflow:
- Git folks: commit anything new/modified. Start with a clean working tree.
- Submit the above
download.file()command in the R Console to make sure it works. - Inspect the downloaded words file any way you know how; make sure it’s not garbage. Size should be about 2.4MB.
- Delete
words.txt. - Put the above rule into your
Makefile. From the shell, entermake words.txtto verify rule works. Reinspect the words file. - Git folks: commit
Makefileandwords.txt.
See the sample Project at this point in this commit.
Copy the dictionary
On Mac or Linux systems, rather than download the dictionary, we can simply copy the file /usr/share/dict/words that comes with the operating system. In this alternative rule, we use the shell command cp to copy the file.
words.txt: /usr/share/dict/words
	cp /usr/share/dict/words words.txt
This rule copies the input file /usr/share/dict/words to create the output file words.txt. We then repeat these file names in the command rule, which is redundant and leaves us vulnerable to typos. make offers many automatic variables, so the revised rule below uses $< and $@ to represent the input file and output file, respectively.
words.txt: /usr/share/dict/words
	cp $< $@
Suggested workflow:
- Git folks: commit anything new/modified. Start with a clean working tree.
- Remove
words.txtif you succeeded with the download approach. - Submit the above
cpcommand in the shell to make sure it works. - Inspect the copied words file any way you know how; make sure it’s not garbage. Size should be about 2.4MB.
- Delete
words.txt. - Put the above rule into your
Makefile. From the shell, entermake words.txtto verify rule works. Reinspect the words file. - Git folks: look at the diff. You should see how your
words.txtrule has changed and you might also see some differences between the local and remote words files. Interesting! CommitMakefileandwords.txt.
See the sample Project at this point in this commit.
Create rules for all and clean
It would be nice to execute our make rules from RStudio. So it’s urgent that we create phony targets all and clean, which are the only targets accessible from RStudio. These targets are phony in the sense that they do not specify an actual file to be made, rather they just make it easy to trigger a certain action. all and clean are phony targets that appear in most Makefiles, which is why RStudio makes it easy to access them from the IDE.
Edit your Makefile to look like this (where your words.txt rule can be the copy or download version):
all: words.txt

clean:
	rm -f words.txt

words.txt: /usr/share/dict/words
	cp /usr/share/dict/words words.txt
Since our only output so far is words.txt, that’s what we associate with the all target. Likewise, the only product we can re-make so far is words.txt, so it’s the only thing we delete via clean.
Suggested workflow:
- Use
make cleanfrom the shell and/or RStudio > Build > More > Clean All to deletewords.txt.- Does it go away?
- Git folks: does the deletion of this file show up in your Git tab?
- Use
make allfrom the shell and/or RStudio > Build > Build All to getwords.txtback.- Does it come back?
- Git folks: does the restoration of
words.txtcause it to drop off your radar as a changed/deleted file? See how this stuff all works together?
- Git folks: Commit.
See the sample Project at this point in this commit.
Create a table of word lengths
This rule will read the list of words and generate a table of word length frequency, stored in a tab-separated-values (TSV) file. This R script is a little longer, so we’ll put it in its own file, named histogram.r. If either the script histogram.r or the data file words.txt were to change, we’d need to rerun this command to get up-to-date results, so both files are dependencies of this rule. The input-file variable $< refers to the first dependency, histogram.r.
histogram.tsv: histogram.r words.txt
	Rscript $<
FYI: Rscript allows you to execute R scripts from the shell. It is a more modern replacement for R CMD BATCH (don’t worry if you’ve never heard of that).
Create the R script histogram.r that reads the list of words from words.txt and writes the table of word length frequency to histogram.tsv. It should be a tab-delimited TSV file with a header and two columns, named Length and Freq. Hint: you can accomplish this task using four functions: readLines, nchar, table and write.table. Here’s one solution, but try not to peek until you’ve attempted this task yourself.
Suggested workflow:
- Develop your
histogram.rscript interactively. Make sure it works when you step through it line-by-line. Debugging only gets harder once you’re running entire scripts at arm’s length viamake! - Remove
histogram.tsv. Clean out the workspace and restart R. Runhistogram.rviasource()or using RStudio’s Source button. Make sure it works! - Add the
histogram.tsvrule to yourMakefile. - Remove
histogram.tsvand regenerate it viamake histogram.tsvfrom the shell. - Git folks: Commit.
See the sample Project at this point in this commit.
Update rules for all and clean
The new output histogram.tsv can replace words.txt as our most definitive output. So it will go in the all rule. Likewise, we should add histogram.tsv to the clean rule. Edit your all and clean rules to look like this:
all: histogram.tsv

clean:
	rm -f words.txt histogram.tsv
Suggested workflow:
- Use
make cleanfrom the shell and/or RStudio > Build > More > Clean All.- Do
words.txtandhistogram.tsvgo away? - Git folks: does the deletion of these files show up in your Git tab?
- Do
- Use
make allfrom the shell and/or RStudio > Build > Build All to getwords.txtback.- Does it come back?
- Git folks: does the restoration of the files cause them to drop off your radar as changed/deleted files?
- Git folks: Commit.
See the sample Project at this point in this commit.
Plot a histogram of word lengths, update all and clean
This rule will read the table of word lengths and plot a histogram using ggplot2::qplot(). The R snippet is three lines long, but we’ll still include the script in the Makefile directly, and use semicolons ; to separate the R commands. The variable $@ refers to the output file, histogram.png.
histogram.png: histogram.tsv
	Rscript -e 'library(ggplot2); qplot(Length, Freq, data=read.delim("$<")); ggsave("$@")'
Suggested workflow:
- Test the histogram-drawing code in the R Console to make sure it works.
- Inspect the resulting PNG to make sure it’s good.
- Clean up after yourself.
- Add the above rule to your
Makefile. - Test that new rule works.
- If you get an unexpected empty plot
Rplots.pdf, don’t worry about it yet. - Update the
allandcleantargets in light of this addition to the pipeline. - Test the new definitions of
allandclean. - Git folks: commit.
NOTE: Why are we writing this PNG to file when, by the end of the activity, we are writing an R Markdown report? We could include this figure-making code in an R chunk there. We’re doing it this way to demonstrate more about R and make workflows. Plus sometimes we do work this way in real life, if a figure has a life outside one specific R Markdown report.
See the sample Project at this point in this commit.
Use make to deal with an annoyance
The code used above to create histogram.png usually leaves an empty Rplots.pdf file behind. You can read this thread on stackoverflow if you’d like to know more.
We’ll just use this as a teachable moment to demonstrate how handy an automated pipeline is for dealing with such annoyances and to show a multi-line make rule.
Update the histogram.png rule like so:
histogram.png: histogram.tsv
	Rscript -e 'library(ggplot2); qplot(Length, Freq, data=read.delim("$<")); ggsave("$@")'
	rm Rplots.pdf
Suggested workflow:
- Remove
Rplots.pdfmanually - Add the
rm Rplots.pdfcommand to thehistogram.pngrule. - Test that new rule works.
- Test that behavior of
allandcleanstill good. - Git folks: commit.
See the sample Project at this point in this commit.
Render an HTML report
Finally, we’ll use rmarkdown::render() to generate an HTML report. If we think narrowly, we might say that the HTML report depends only on its Markdown predecessor, which would lead to a rule like this:
report.html: report.md
	Rscript -e 'rmarkdown::render("$<")'
But we really shouldn’t hard-wire statements about word length in Markdown; we should use inline R code to compute that from the word length table. Similarly, if the plotted histogram were to change, we’d need to remake the HTML report. Here is a better rule that captures all of these dependencies:
report.html: report.rmd histogram.tsv histogram.png
	Rscript -e 'rmarkdown::render("$<")'
Create the R Markdown file report.rmd that reads the table of word lengths histogram.tsv, reports the most common word length, and displays the pre-made histogram histogram.png. Here’s one solution, but try not to peek until you’ve attempted this task yourself.
Suggested workflow:
- Develop
report.rmd, running the R chunks often, from a clean workspace and fresh R session. Debugging only gets harder once you’re rendering entire reports at arm’s length viamake! - Render the report using
rmarkdown::render()in the Console or RStudio’s Preview HTML button. - Clean up after yourself.
- Add the above rule for
report.htmlto yourMakefile. - Test that new rule works.
- Update the
allandcleantargets in light of this addition to the pipeline. - Test the new definitions of
allandclean. - Git folks: commit.
See the sample Project at this point in this commit.
The Final Makefile
At this point, your Makefile should look something like this:
all: report.html

clean:
	rm -f words.txt histogram.tsv histogram.png report.md report.html

words.txt: /usr/share/dict/words
	cp /usr/share/dict/words words.txt

histogram.tsv: histogram.r words.txt
	Rscript $<

histogram.png: histogram.tsv
	Rscript -e 'library(ggplot2); qplot(Length, Freq, data=read.delim("$<")); ggsave("$@")'
	rm Rplots.pdf

report.html: report.rmd histogram.tsv histogram.png
	Rscript -e 'rmarkdown::render("$<")'
Remember, you can review the entire activity via the commit history of the sample Project: https://github.com/STAT545-UBC/make-activity.
And that’s how a data analytical pipeline gets built using make, the shell, R, RStudio, and optionally Git.
Appendix
Here are some additions you might like to include in your Makefile:
.PHONY: all clean
.DELETE_ON_ERROR:
.SECONDARY:
The .PHONY line is where you declare which targets are phony, i.e. are not actual files to be made in the literal sense. It’s a good idea to explicitly tell make which targets are phony, instead of letting it try to deduce this. make can get confused if you create a file that has the same name as a phony target. If for example you create a directory named clean to hold your clean data and run make clean, then make will report 'clean' is up to date, because a directory with that name already exists.
.DELETE_ON_ERROR causes make to “delete the target of a rule if it has changed and its recipe exits with a nonzero exit status”. In English, this means that – if a rule starts to run but then exits due to error – any outputs written in the course of that fiasco will be deleted. This can protect you from having half-baked, erroneous files lying around that will just confuse you later.
.SECONDARY tells make not to delete intermediate files of a chain of pattern rules. Consider creating a Makefile with two pattern rules, %.md: %.rmd and %.html: %.md, and then running make report.html. After make has created report.md and report.html, it will delete the intermediate file report.md. Adding .SECONDARY to your Makefile prevents the intermediate file from being deleted.
back to All the automation things